Installing a single column solar panel involves several steps that ensure proper setup and efficiency in harnessing solar energy. Understand the location and orientation, which is crucial for maximizing sunlight exposure throughout the day, 2. Prepare the site, requiring the right tools and a. . hotovoltaic(PV) installations operate at their best. They provide the structure needed to hold the panels in place at their optimal a gles,allowing them to genera pole with a concrete anchor is placed on the ground. Imagine growing a full vegetable garden in your balcony -. . Before we get into the nitty-gritty of how to install solar panels on your rooftop, balcony, or grounds of your property, it's crucial to understand that photovoltaic modules (PV) — like solar panels and shingles — require additional components to operate.
[pdf] When installing 108 photovoltaic panels, think of it as assembling a solar orchestra where each section must harmonize. Unlike smaller residential setups, this scale requires professional system voltage optimization and string inverter coordination. Let's break down the. . Aptos Solar Technology panels may be installed in various applications. Installer must handle and mount the modules to prevent any impact on front surface, back surface, and frames as this could result in damage. Support structures. . panel. Accordingly, the values of Isc and Voc (e., inverter) connected to the PV output. If you have any questions, please contact sales or customer service staff of Risen for further understanding.
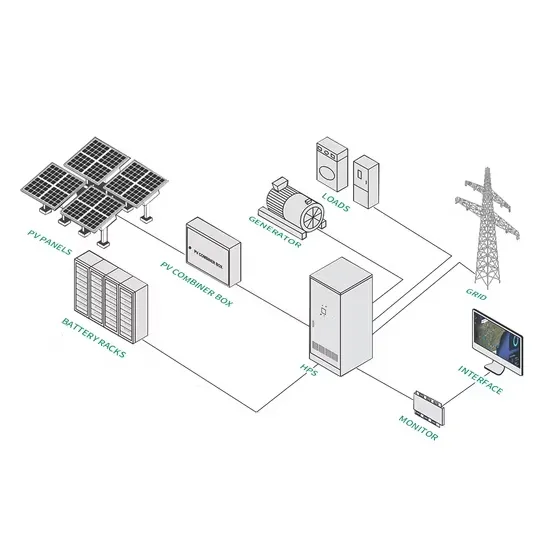
[pdf] A crucial part of this installation process is understanding the wiring diagram for your photovoltaic (PV) solar panels. This diagram outlines the necessary connections between the panels, batteries, and other components to ensure a properly functioning system. A photovoltaic (PV) installation consists of several key components that must be correctly represented. . This article explains these diagrams and how to use them for successful solar operations.
[pdf] Photovoltaic bracket two and a half rows installati and/or mounting in compliance with the include instructions. The system is a non-separately derived syst. ng and firmly conntected to the mounting rail. Despite the highest qual-ity standards sharp edges may occur on metallic components. Please review the following before installation ●Make sure the roof is in proper condition. . There are two main drawings you need to install a solar power system, the solar panel mounting bracket installation drawing and the solar system circuit diagram. National and local building regulations and environ-mental requirements must be adhered to.
[pdf] Shop for Solar Panel Mounting Brackets at Walmart. Live better. Check each product page for other buying options. This selection of top of pole mount kits is engineered. . Uses item details. Live better . Professional Installation Recommended for 8+ Panels: While smaller 1-4 panel systems are suitable for DIY installation, systems with 8 or more panels require professional installation due to complex foundation requirements, safety considerations, and local permit compliance. It offers a wide range of adjustment to suite a variety of solar panels.
[pdf]